
Wednesday, February 19, 2014

Friday, January 10, 2014
ABC's in Pen
So I have yet to set up my studio, and until then I am going to try to use more pen and ink. With that thought in mind, I posted this picture I made for a show I had in 2013.
When I started creating this piece, I did not budget enough time. I had naively thought that using only one medium, pen, would make this piece a quicker finish. I was very wrong. Each letter took on average two hours; some letters took upwards of three hours while other letters one hour. I used sepia colored pens with different sized nibs. The letters are about two and a half inches tall and the entire piece is roughly 2'x2'.

When I started creating this piece, I did not budget enough time. I had naively thought that using only one medium, pen, would make this piece a quicker finish. I was very wrong. Each letter took on average two hours; some letters took upwards of three hours while other letters one hour. I used sepia colored pens with different sized nibs. The letters are about two and a half inches tall and the entire piece is roughly 2'x2'.
Monday, December 30, 2013
Key Series
I haven’t been able to post anything in a while. Who would have thought that there are places in the U.S. where you can’t get Internet. I am now one of those people sitting in coffee shops on my computer.
We have recently moved across the country, and finding work has been more difficult than I first imagined. So unfortunately my studio time has suffered. I am currently working on making a studio space where I can continue working on my illustrations.
Until then, I thought I would post some older art work.
This series initially started out as sketches in my sketchbook, and were originally part of only one composition. I had spent so much time drawing and researching keys that I thought it would be a waste to make only one final product.
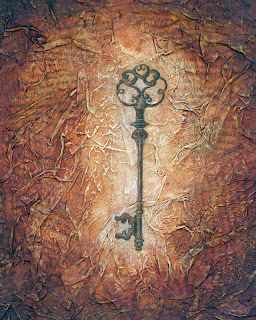
To create uniformity, I worked on all three of these at the same time. I had an old book that I took the pages out of and wrinkled up all of the pages. I then used a spray adhesive, sprayed my illustration board, and pressed all of the wrinkled book pages.

After the book pages were dry on the illustration board, I used a thin wash of matte medium gesso in the center of the boards. I wanted the keys to have a semi-blank background, but the surrounding to have the texture of the words on a page.

After I drew the keys in colored pencil, I applied a thin layer of watercolor. When the watercolor was dry, I sprayed a light layer of fixative, then another thin layer of clear matte medium gesso. I generally like to wait a day for the matte medium to dry before I put on the layer of oil. After the oil was dry, a light brush with some colored pencils show cased the texture of the background.
We have recently moved across the country, and finding work has been more difficult than I first imagined. So unfortunately my studio time has suffered. I am currently working on making a studio space where I can continue working on my illustrations.
Until then, I thought I would post some older art work.
This series initially started out as sketches in my sketchbook, and were originally part of only one composition. I had spent so much time drawing and researching keys that I thought it would be a waste to make only one final product.

To create uniformity, I worked on all three of these at the same time. I had an old book that I took the pages out of and wrinkled up all of the pages. I then used a spray adhesive, sprayed my illustration board, and pressed all of the wrinkled book pages.

After the book pages were dry on the illustration board, I used a thin wash of matte medium gesso in the center of the boards. I wanted the keys to have a semi-blank background, but the surrounding to have the texture of the words on a page.

After I drew the keys in colored pencil, I applied a thin layer of watercolor. When the watercolor was dry, I sprayed a light layer of fixative, then another thin layer of clear matte medium gesso. I generally like to wait a day for the matte medium to dry before I put on the layer of oil. After the oil was dry, a light brush with some colored pencils show cased the texture of the background.
Tuesday, July 30, 2013
Moving across the country
I have been moving across the country, and have yet to set up a studio. I will be posting as soon as I have reliable access to the Internet, sorry for the lack of pictures and posts.
Monday, May 13, 2013
Future Astronaut

Future
When I was young, boxes were magical. With a little imaginative help, a box would turn into anything; a castle, fort and of course a space ship. Now I love letting kids use their imagination when playing. When you foster imagination at a young age, creativity blossoms and can be used throughout their school years, and beyond.
Wednesday, May 8, 2013
Tribute

Tribute
These three illustrators are some of my favorites, Maurice Sendak, Dr. Seuss, and Tim Burton. I used pencil, and watercolor to create the "snap-shots" of each illustrator to show their most iconic images.
Tuesday, April 30, 2013
Farewell Alabama

My husband's flight training is winding down, and it is almost time to say "farewell" to Alabama. We have made several friendships that will be hard to leave, but it is always fun to have friends all over the country and the world. Good friends are hard to find, and we have been fortunate to find several.
We truly enjoyed our time here and will never forget Alabama!
Sunday, April 21, 2013
Training

Training
My husband had to leave for one of his many military trainings. While he was gone, I saw his boots and wanted to capture a simple memory of him.
When he was done with his training and saw the drawing, he asked me why boots? I had to think about it. Boots are what get you to and from where you need to go. While everyone looks the same in their uniform, (which of course is the point) the boots have a different wear pattern. I was going to re-work this drawing before posting, however when I went to grab his boots, they were his flight boots, and not the summer boots. They had a totally different wear pattern and look. Each of his many pairs of boots are different and are worn for different reasons, flight, summer, winter, and special training.
I have come to understand so much more about the military in my short time as a military wife. I understand why everyone has to look the same; the same uniform, hair cut, and boots. It is hard to tell individuals apart, I didn't see my husband when he was standing three feet from me. He of course thought that was hilarious. When everyone is the same, or at least looks the same, you begin to notice the tiniest differences. For me at least, I notice the boots.
Wednesday, April 10, 2013
Urban

"Urban"
As busy as city life can be, everyone likes to get away every now and then. Sometimes the city life can be very oppressing. Each person has to choose their own path, and mine has definitely lead me out of the city, of that I am thankful.
Tuesday, April 9, 2013
Steps of a Mural Painting

Step #1
After meeting with my client; talking about what she wanted and envisioned and showing me some pictures, I came up with this sketch. I used a long/wide sketch because the client had said that the wall was 3'x6'. The client approved the sketch and I went to work.


Day #1
I prepped the wall, that included washing off the wall with a wet sponge and some dish soap. After letting the wall dry, I taped the edges. I then wet a sponge and added some gesso. The original wall did not have much texture to begin with, but the gesso wash that I added helped in filling in some of the texture. I also wanted to add the gesso wash to the wall to make sure the paint would stick. The gesso wash dried quickly and I sketched out in pencil what I was planning on painting. Pencil is much easier to erase and change than acrylic paint.
*Side note: I was talking to my husband and he asked how big the wall/mural was. I promptly and confidently replied, 3'x6. He said so about this big, and demonstrated on a wall. I looked at him, laughed and then demonstrated about how big it was. He looked at me confused and asked if I had measured it; my prompt reply was nope. I had just eyeballed it and knew that I could paint it. Long story short, the wall is closer to 3.5'x 9'.


Day #2
I like working the whole piece, no matter the size. I painted a base layer. With the base layer painted I could see how the paint was working with the wall and lighting.


Day #3
I again worked the entire piece, by adding more layers. The biggest change for Day 3 was the addition of the poppies. Other layers included highlights and shadows.


Day #4
The biggest thing on this day was the addition of the highlights to the fields. I was pleasantly pleased with how well the poppy fields look. I liked how the piece looked, and was mostly finished. I say mostly, because I had worked on this piece for 4 days in a row, and wanted to take a step back and look at it again with fresh eyes. I also wanted the client to look at see if there was anything else she wanted.


Day #5
I came back about a week later to double check, the client had asked for more bushes in the middle ground. Besides adding more bushes, I also made some of them bigger. The size of the bushes in the middle ground really added depth and perspective. I was also able to add more shadows and highlights to some of other areas. I am really happy with the final painting.
Wednesday, April 3, 2013
Easter Egg

So when "EGG" came up for illustration, I wondered what it would look like if the traditional sizes were reversed. Pictures always seem to show the Easter Bunny huge, hopping around around. . This bunny definately can not hop around with his current load.
Happy Easter!
Thursday, March 28, 2013
Swim

"Swim"
It is always fun to go to a pool in the summer time and see kids practicing their swim moves. My favorite has always been diving. The smooth and gracefulness of a dive has yet to be mastered by most kids and usually ends up being a magnificent belly-flop. Undaunted, the kids will pop up out of the water and try again, and again, and again. They can go all day!
Just like having the sparkle shoes makes you run faster, having all the correct swim gear makes you a swimmer. Water wings, inner tube, life jacket, and fins complete this little boys swim attire. His gear is complete as he is about to gracefully belly-flop into summer.
Wednesday, March 20, 2013
Little Red Wagon

When I saw the word of the week, "eye glasses", several ideas played through my head. I thought of several play on words and other ideas, but none seemed to be my style. I thought of having someone running around with flight goggles, but I had already done flight ideas two times in a row, so I thought I should branch out.
However, the flight idea did give my another idea. I have very fond memories of me and my sister flying down my grandparents hill in Grandpa's little red wagon. Our safest hill we decided was one where, at the bottom of the hill we had to turn sharply to avoid going through Grandma's beautiful flower beds. We thought that we would just stop after the flower beds (7 and 8 year olds do not have much of a grasp on physics). Physics still apply to kids, thankfully just past the flower beds was a bed of ivy and a fence blocking a steep hill. A bed of ivy does wonders at stopping a little red wagon, and when the ivy didn't work the fence always did.
After our afternoon of fun, we looked back at Grandma's beautiful flower beds. Our 7 and 8 year old intentions of avoiding the flower beds had failed miserably. We brilliantly thought to fluff the flowers back up to where they looked a little less run over. After much fluffing and leaning we went in for dinner thinking we were brilliant masterminds. Grandma never said a word.
Thursday, March 14, 2013
Yesterday

The word of the week is "yesterday", and I love this. It might have to do with my husband being a pilot, but I'm trying not to be too biased.
I researched WWII pilot's uniforms. They are very different from today's military pilots. I had this idea for a little while, but had never finished the thought on paper. I like that a WWII pilot is looking at some of the newest planes we have. I am very pleased with this.
Tuesday, March 12, 2013
Sketch of a Mural Painting

I just received a commission to paint a mural. I haven't painted a mural before, so I thought I would share my step by step process. The wall itself is about 3' high, and 6' wide. My client gave me a couple of pictures to work with, and this is an idea that I came up with. I am still in the sketching phase, and this is a rough composition, but the idea is clearly shown.
Thursday, March 7, 2013
Boy Pilot

I had originally wanted this to be in sepia tones. After looking through my illustrations, I thought I should try something new. I wanted a warm looking piece with a final blue glaze. Putting a blue oil glaze usually makes pieces look cooler. Since I knew I was going to put a blue wash, my first step to make the piece warm was the watercolor layer. I put a yellow green watercolor wash for the background, and was able to bring it out in the final stage.
As soon as this idea popped into my head I loved it! I didn't intentionally draw it to look like my husband, however looking at this now there are a few similarities and can imagine him doing this same thing.
Thursday, February 28, 2013
Ghosting in the Library
Shh....
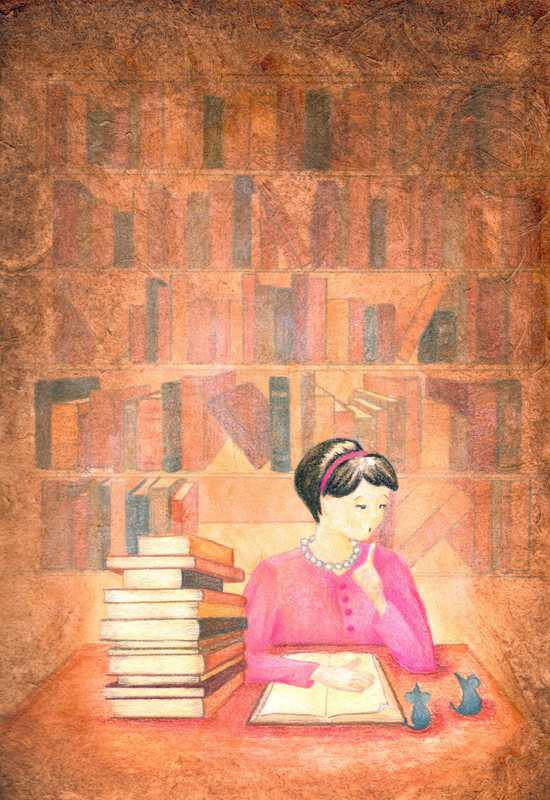
I finally ghosted a piece! I have seen other illustrators use this technique beautifully and have always wanted to try it. Ghosting is basically a thin wash of white gesso; it creates instant depth and focus. The background falls to the back while the foreground gets pulled to the front.
Step #1Color
Color the entire piece. I used prisma color pencil, and colored everything. Make sure the values; shadows and highlights, are exactly how you want them. The piece should look done.
Step#2 Gesso Wash
I really wanted the fore ground to stand out more. I took a thin layer of white gesso and painted the shelf behind the librarian. I ended up painting 3 thin layers.
Step #3 Matte Medium and Clear Gesso
I applied a thin layer of matte medium and clear gesso over the entire piece.
Step #4 Oil wash
I painted a thin layer of oil wash over the piece. I brought out the texture by lifting off some of the oil with a needed eraser. I also darkened the top corners to bring the focus again more on the librarian.
Now that I have successfully ghosted a piece, I am excited to try it again.
Sunday, February 17, 2013
Digital vs Traditional Painting
I tried something new this week, I mixed media that I hadn't really mixed before; digital and traditional. I have seen several other artists do this, but never thought I could do it. I wasn't too sure of the process and layers that the other artists used. After doing a little bit of research, this method worked for me. I might try other ways later, but for right now; this works.
 I painted this picture with traditional watercolor. I used several layers of paint, slowly building up to the depth of color I wanted.


Traditional
Digital
I digitally "painted" with a brush in thin layers, just as if I was painting traditionally. I did have to play around with some different brushes before I found the one that worked. The bonus of working digitally is that you can delete a layer if it doesn't work.
Digital
I debated between adding text or leaving it "empty". My husband thought of the text, and it was better than the nursery rhyme I was going to go with. The added text definitely makes me giggle more than with out the text, and it basically summarizes the nursery rhyme in one word.
"Baa..ld"
Saturday, February 16, 2013
Valentines Day

Sweet Love
I love the looseness of this piece. I used only water color for this piece. However I wanted to play around with it digitally. I played around with several different filters; cool and warm filters and at different percentages, and some fun random colors.
I ended up going with a warm filter. I had thought about going with a red or pink filter in honor of Valentines Day. The thing is with red, especially with this piece, I was worried that it would look too much like a blood bath.
I love that there is a full range of values, from white all the way to black and in between. It is a simple design, but I really like it.
Wednesday, February 13, 2013
Tire Swing

I completely forgot to post this up here last week. I love this composition. I had done a piece very similar to this a few years ago, and sold it. I always thought about it, and wanted to see it again in my house.
Step #1 Prisma Color
I used Prisma Color Pencils for the first layer. I used several different colors for the grass, trees and the kid on the tire swing. I never use one color for a section. For example the grass; I used tans, browns, several greens and some yellows. If you look outside, there is never a solid color in nature. If you look at your lawn you see the green grass, the new and old stalks of grass, the dead grass; and a single blade of grass is not a single color. The more you mix colors the richer your piece will look.
Step #2 Water Color.
I water colored the entire piece. I first painted the sky. I love the flexibility and how smooth watercolors are. After the sky was dry, I painted over everything else. This really does tie everything together and fills in spots that normally a pencil doesn't get.
Step #3 Gesso and Matt Medium Layer
After the watercolor was dry, I sprayed it with a fixative. I layered the matte medium and gesso of the piece to prep for the oil layer.
Step #4 Oil
The gesso and matte medium layer took about 5 hours to dry. (It depends on the thickness of the layer that you put down.) I used an umber oil wash for the most of the lower half. In the very top of the piece I put a burnt sienna color. I love how warm the finished piece looks and am glad I redid it.
Subscribe to:
Posts (Atom)